Hosting my Django Site elsewhere
If you build your website using pedestrian.site -- then one of the benefits of the extremely simple architecture your application has, is that you can move it elsehwere extremely easy. It is supposed to be a self-contained Python Django application with very little requirements on infrastructure. Now, obviously, if you wish to run your application for many, many thousands of users -- these architectural choices might need a revisit; fixing that is not too hard though :-)
Step 1, Create a webapplication
I created an application with this prompt:
Create an application where users can register, login -- then they should put in their home address, please do an openstreetmap preview of the location - once done, they should be able to register dogs passing by their house.
It can be seen here: e1e82234-ce2b-4b8b-9a4c-d6312a0ad007.pedestrian.site/. It's really simple. When you create your own, do test it online, and tell Mistral AI to fix whatever is not working or just wrong.
Step 2, Downloading..
If you log in to pedestrian.site and 'view details' on your application, you will see a button called 'Download App'. If you click that one, you will receive a zip-file containing your application. Do that. I did that with my application; please follow these steps to run it from your laptop (example should work for Mac and Linux):
$ unzip -q Dogs_at_my_House.zip
$ cd Dogs_at_my_House
$ python3 -m venv venv
$ source venv/bin/activate
(venv) $ pip3 install -r requirements.txt
At this point, you should edit the settings.py file located in the project subdirectory, in my case dogwatch/settings.py - the following
settings need to change:
HOSTNAME
LOGGING / handlers / file / filename
Eventually you might consider flipping 'DEBUG' to 'False', as running it with 'True' can expose details about your application that you would not want to expose. With this, you can run the application by doing:
(venv) $ python3 manage.py runserver
Step 3, Further Considerations
Now, you might want to change certain things to harden this application and provide a more solid infrastructure, this could be:
- Using a reverse proxy to handle certificates and thus TLS traffic
- Installing a relational database and not use SQLite
- Have it run by systemd/launchd
- Fronting it with a CDN
All this is not hard to do; the Django framework and the community around Django provides plenty of documentation. Your case might differ ever so slightly from the tutorials, so do not be afraid to reach out.
Tags: python, django, software
Running my own Mailserver
I've been running my own mailserver for quite a while, years actually, but buying a new domain along with a server at Hetzner, I needed to do a fresh install. And it's been a while since I did that.
The recent years, my go-to mailserver has been Stalwart -- it comes with basically
everything included. Okay, it would be nice if they'd supply Debian packages for a smooth and secure install.
I've never fancied these curl | bash install schemes; but I gave it a go; downloaded the shell script
and executed it. Et voilà - you fire up your browser and access the webui.
Configuring Stalwart for you domain is super simple, head straight to Directory -> Domains -- select 'Create domain' and enter the domain name. Then it'll actually show you a bunch of DNS records you may add in your DNS management console, see here:
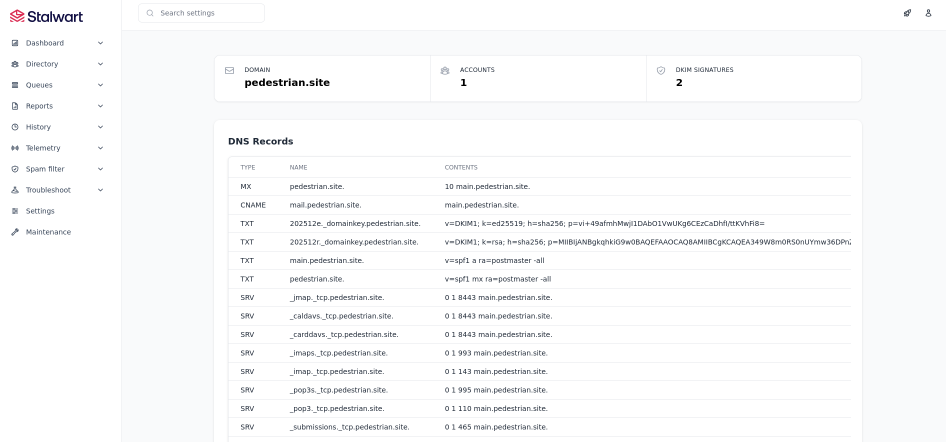
This page alone removes a lot of complexity in setting up a proper mailserver. For Stalwart to be able to present this information it has already done quite a bit of tedious work for you; try googling 'dkim install guide' and see where that lands you. And yes, I do change bits here and there, the SPF record for one, but as a starting point it's really good; and no, none of this information is secret, you can look it up online yourself -- well, the parts that I did put out there :-)
My mailserver was flying within minutes -- then I spent several hours not being able to figure our why mails where unable to be sent or received... Then finally, I found this: Hetzner FAQ:
Why can I not send any mails from my server?
Unfortunately, email spammers and scammers like to use cloud hosting providers. And we at Hetzner naturally want to prevent this. That's why we block ports 25 and 465 by default on all cloud servers. This is a very common practice in the cloud hosting industry because it prevents abuse. We want to build trust with our new customers before we unblock these mail ports. Once you have been with us for a month and paid your first invoice, you can create a limit request to unblock these ports for a valid use case. In your request, you can tell us details about your use case. We make decisions on a case-by-case basis.
Aha, once I've been with Hetzner for a month, then they'll consider opening port 25 :-)
It all makes sense, running a mailserver is serious business and I will contact Hetzner in a moth. For now I'll take comfort in knowing that my nftables stills are okay :-)
Tags: computer, software, email
Pedestrian Site
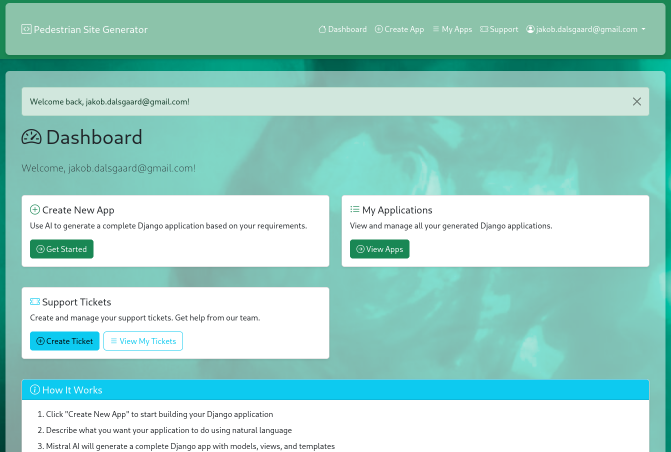
This is a short introduction of the Mistral AI powered Django application builder available at pedestrian.site. This service aims at building a fully functional Django application given a short description of the requirements. Using the service is fairly simple, head to the site and login or register:

You need to register with a valid email address as you will be sent a validation email; once you have validated your email, you should be able to login and create applications. You can select 'Create New App', 'My Applications' or 'Support Tickets' -- as can be seen here:
Now, when creating an application, you'll be assigned a container in which Mistral attempts to build the application; the web application running inside this container will be accessible online through a link like this one: 9d157f4a-bdee-4f7d-8971-3f28e98ba234.pedestrian.site -- this is the link you see on the details page next to the application name.

Even if Mistral believes the application generation failed, you might actually have something running. You may continue the conversation with Mistral at the bottom of the page.
Right now the tool does not have integration to any revision system; however, you may download the full application by using the 'Download App' button. Also, there is no email functionality easily available -- it might come, it might not. You should also be aware that the container assigned to your application is limited in terms of CPU, memory and disk and it will be paused after 2 weeks -- this'll give me some time to figure out next steps for this service.
Prometheus Amok
Got my new setup with a Linux box as router (an old Dell PowerEdge, but with two gigabit ports, and it handles gigabit traffic tremendously well, couldn't be happier). Besides the Linux box, I now run a managed switch and an Ubiquiti access point. All this equipment can be monitored in very many ways; but I'd like the metrics to be gathered in one uniform application, so I installed Prometheus - a time series database to store all sorts of metrics in; I then put Grafana in front of it -- whilst Prometheus has a very nice UI itself, Grafana does come with a lot of nice features, such as dashboards and alerting.
The World of Prometheus Exporters
Unifi Prometheus Exporter
To be fetched from here: Unifi Scraper — now author recommends a docker; I'm more a fan of running my stuff on a real machine. So I opted for a plain normal install on the box.
export SRCDIR=$PWD
mkdir -p src/github.com/mdlayher
cd src/github.com/mdlayher
git clone https://github.com/mdlayher/unifi_exporter.git
cd unifi_exporter
go get
GOPATH=$SRCDIR go build ./cmd/unifi_exporter
And voilá I have the static binary unifi_exporter; copy that one to /usr/local/sbin; then make a
service unit file:
[Unit]
Description=Prometheus Unifi Exporter

[Service]
ExecStart=/usr/local/sbin/unifi_exporter -config.file /etc/prometheus/prometheus-unifi-exporter.yml

[Install]
WantedBy=multi-user.target
Save that in prometheus-unifi-exporter.service, copy to /etc/systemd/system/ and do a systemctl daemon-reload.
The yaml config file can look like this:
listen:
  address: :9130
  metricspath: /metrics
unifi:
  address: https://my.domain.name:9445
  username: PrometheusUnifiExporter
  password: DamnPrometheus
  site:
  insecure: true
  timeout: 5s
For this go program to accept the Unifi application, I need to install at least a self signed certificate in Unifi, and Ubiqiti has not made that proces easy. I found it to work this way:
First create a self signed certificate with your designed hostname as CN:
# Make self signed certs
openssl req -x509 -newkey rsa:4096 -keyout key.pem -out cert.pem -days 365
Then convert it to pkcs12 to have something the Unifi java application wants to play with:
# pacakge in pkcs12
openssl pkcs12 -export -in cert.pem -inkey key.pem -out unifi.p12 -name unifi  -caname root
Now update the keystore with this very fine pkcs12 certificate:
# use keytool to update keystore
keytool -importkeystore -deststorepass aircontrolenterprise -destkeypass aircontrolenterprise -destkeystore new-keystore -srckeystore unifi.p12 -srcstoretype PKCS12 -srcstorepass temppass -alias ubnt -noprompt
I believe keytool can come from just about any java you have lying around. Now shut down your Unifi Controller application, take a backup copy of
/usr/lib/unifi/data/keystore file, copy new-keystore to /usr/lib/unifi/data/keystore and start your Unifi Controller again and your Unifi
Controller should be running with a brand new self signed certificate.
Now the prometheus unifi exporter service can be installed by doing systemctl start prometheus-unifi-exporter.
Openhab Exporter
I run openhab2, so obviously I needed an exporter for that too -- found this one: https://github.com/baaym/openhab2-prometheus-exporter -- and
it looked fine, installed it in /opt/openhab2-exporter did the relevant gunicorn install:
sudo apt install python3-gunicorn
Make sure you change line 7 in the python script to reflect your openhab setup, the line looks like this url = urllib.request.urlopen('http://...
-- the address there should match your openhab2 configuration.
Then did a systemctl module file by the name of /etc/systemd/system/openhab2-exporter.service -- with contents:
[Unit]
Description=OpenHAB2 Prometheus exporter
After=openhab2.service

[Service]
WorkingDirectory=/opt/openhab2-exporter
ExecStart=/usr/bin/gunicorn3 -w 4 -b 127.0.0.1:9195 openhab2-exporter:app
Restart=on-failure

[Install]
WantedBy=multi-user.target
Alias=openhab2-exporter.service
Then sudo systemctl daemon-reload and sudo systemctl start openhab2-exporter -- and adding this configuration to prometheus.yml:
  - job_name: 'openhab2_exporter'
    scrape_interval: 10s
    scheme: http
    static_configs:
      - targets:
        - 'localhost:9195'
A restart of prometheus and it's data is available.
SNMP Exporter
Well.. SNMP is not that easy to understand, imho. But this project Prometheus SNMP Exporter
does a fairly good job of easing the trouble. Got it installed and running. Did a unit file prometheus-snmp-exporter.service:
[Unit]
Description=Prometheus exporter for SNMP-enabled devices
Documentation=https://github.com/prometheus/snmp_exporter
After=network.target

[Service]
User=prometheus
EnvironmentFile=/etc/default/prometheus-snmp-exporter
ExecStart=/usr/bin/prometheus-snmp-exporter $ARGS
ExecReload=/bin/kill -HUP $MAINPID

[Install]
WantedBy=multi-user.target
And the obligatory sudo systemctl daemon-reload and sudo systemctl start prometheus-snmp-exporter -- and the prometheus.yml configuration:
  - job_name: 'snmp'
    static_configs:
      - targets:
        - openmesh1.lan
        - nanohd1.lan
    metrics_path: /snmp
    params:
      module: [if_mib]
    relabel_configs:
      - source_labels: [__address__]
        target_label: __param_target
      - source_labels: [__param_target]
        target_label: instance
      - target_label: __address__
        replacement: 127.0.0.1:9116  # The SNMP exporter's real hostname:port.
Then, after restarting prometheus, the data is available.
Grafana
Please do install grafana sudo apt install grafana -- you'll love it -- add prometheus as data source and be amazed.
Convert to Lightworks
The Lightworks application is a very nice non-linear video editing system - and, when 720p is sufficient, free of charge! However, it's a bit picky on import formats. I've found the easiest approach to this is installing FFMpeg and batch converting everything you want to import to mpegts, FullHD, 46kHz stereo.

To do so, I've created a script, should work on all unices, available here: convert-to-lightworks -- and also a .bat file for Windows lusers, available here: convert-to-lightworks.bat. They should both support just dropping files onto them from a file manager.
To installl ffmpeg on Elementary OS Freya release, do this:
sudo cat "deb http://www.deb-multimedia.org wheezy main" > /etc/apt/sources.list.d/deb-multimedia.list
sudo apt-get update
sudo apt-get install deb-multimedia-keyring
sudo apt-get install ffmpeg
Tags: computer, video, software
Installing MusicIP Mixer on Debian 8.6 64-bit
In order to have automatic music mixing on a Logitech Media Server (former Slimserver...), now a days you'll need the Music IP Mixer x86 installed. Running that beast on a 64-bit Debian 8.6 requires a bit of configuration.
First; make your platform support x86 (32-bit) binaries:
sudo dpkg --add-architecture i386
sudo apt-get update
sudo apt-get install libgcc1:i386
Now, download the MusicIP software, version 1.8 from the Spicefly Sugarcube homepage:
I then created a user for the MusicIP software, to keep things separated:
sudo user-add -m --system musicip
Now, in the software bundle for Linux, there is an init script called mmserver --
just copy that one to /etc/init.d make it owned by root, and change the username therein
to musicip and the music home to /home/musicip/MusicMagicMixer/ (remember the trailing slash).
You can now start the MusicMagicMixer with:
/etc/init.d/mmserver start
It prints a wee bit on the terminal, but all is good. On all interfaces MusicMagicMixer is now responding to port 10002. You can point your browser to it, and you'll have a fine web UI. You can make it even finer if you download and install the Spicefly Sugarcube MusicIP replacement UI: MusicIP Replacement UI.
Please support software, buy your license to Spicefly Sugarcube: SugarCube Licensing.
Tags: slimserver, squeezebox, logitech, software, debian, linux